Step #2: Design & Build A Nest Site
Materials: Wood, plastic, bamboo, paper, clay or reeds.
Sizes: small (1/8'' or 3.18 mm), medium (3/16'' or 4.76 mm) and large (3/8'' or 9.53 mm) inside diameters. The length of the tube or depth of the drilled hole can be between 3" and 8" (7.6 mm to 20.3 mm).
Styles: Wooden nest blocks, stem bundles, or dried mud bricks. Click the one that you are interested in to see more details. You can also try combinations of these or something else altogether!
Locating & Installing Nest Blocks:
Hang nest blocks in a protected location with light shade. Think about your environment. If you live in a cold region, the sunniest spots may be prime real estate. If you live in a tropical region, shadier spots are likely more enticing to bees and wasps.
Nest site success may be greatest when blocks are firmly attached to a large visible landmark. This may help bees and wasps to locate their nests when returning from foraging. This might be a building, a nest-block shelter painted with bright or contrasting colors or a fence line. Different species of bees and wasps will prefer different situations so try what you think will work and then sit back and observe.
Below, we provide generalized plans for a few
common nest site types.
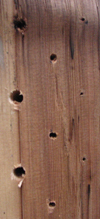
Construct a wooden nest block
|
Use preservative-free lumber: a 4x4 (10 cm x 10 cm) for blocks with shallower depth holes, or a 4x6 (10 cm x15 cm) for blocks with
deeper holes. You can use a rough block of wood instead (e.g. a piece of firewood or a fallen log), as long as it has similar dimensions or is larger in cross-section.
In one side, drill a series of nest holes of appropriate sizes and depths.
Holes should be between 3/32 and 3/8 inch (2.5-10 mm) inside diameter. Some studies suggest that the deeper the hole is, the more likely you will be to get female bees or wasps because bees and wasps can control whether they lay a fertilized (female) egg or an unfertilized (male) egg. The mother bee or wasp will
 often lay female eggs deep inside the hole and male eggs toward the front of the hole. However, some species may prefer small shallow holes- so feel free to experiment!
Holes should be separated by at least 3/4 inch (19mm) from center to center and no closer than that to the edges. Attach a backing board if you drill all the way through your block. Bees and wasps might not use a tunnel that is open at both ends. With smaller diameter drill bits, you may not be able to achieve the 3-inch (8cm) minimum recommended depth. If that is the case, simply drill as deeply as you can; bees that use tunnels of smaller diameters often nest successfully in ones that are not as deep.
|
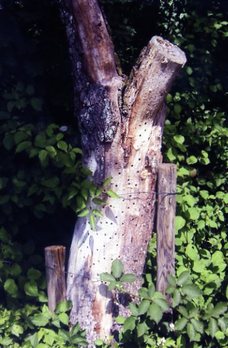
Just simply drilling some holes on a wood log also works.
|
|
The exterior of the block can be rustic or fancy and any color you like. Anecdotal evidence suggest that bees are most attracted to dark nest blocks. As a final step, you can attach an overhanging roof to provide additional shelter from the rain.
It may be important to mount the block so that it does not move or shake in the wind as movement might disrupt the nesting and larval development. The actual height from the ground may play an important role in the species you find nesting. You can try a series of heights to see what works best in your area. If the nest is too low you may get flooding from rain and vegetation may cover the holes. Our nests are between 1' and 6' (0.3 m and 1.8 m) above the ground, although there may be species that prefer higher or lower. |
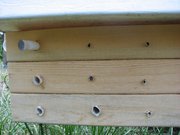
Insert paper straws to smooth the tunnels.
|
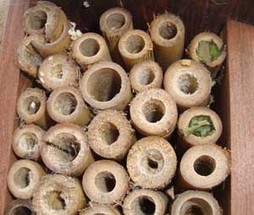
Construct a stem bundle
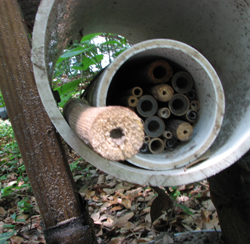
PVC holding stem bundle.
|
Artificial nests can also be constructed with bundles of reed, bamboo or other hollow stem plants. You can also try
using plants with pithy stems that can easily be excavated by bees and wasps. Another option is to drill holes into branches to imitate a hollow stem.
Non-native bamboo can be quite invasive and a quick search online might
lead you to a homeowner that would happily have you clear some of the bamboo from their yards. You can also try paper or cardboard tubes, plastic drinking straws, aquarium tubing, or other materials.
It may be best to cut bamboo below a node (usually indicated by ridge) to create a handful of tubes each with one open end and one closed end. Strap the tubes together into a tight bundle with wire, string, or tape.
|
 A variation on this is to tightly pack the stems into a can, bucket, pitcher or short section of PVC pipe. You could even make a wooden frame or an open-faced birdhouse to hold your stem bundles.
Leafcutter bees using a stem bundle ©Sam O'Dell
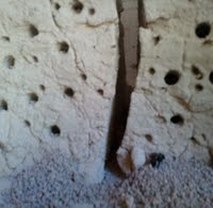
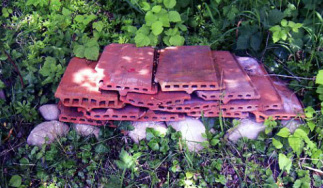
Construct a mud block
Clay blocks
|
Some solitary bees and wasps will nest in cracks or cavities in soft clay or in dry, exposed soil embankments. Some species, such as Anthophora abrupta and A. urbana
will wet the hard soil surface with water or nectar to soften it enough to excavate tunnels. These species are quite common in the southern United States,
and are both important visitors of some fruit and vegetable crops.
To attract these species, dried mud bricks can serve as the equivalent of a wooden nest block. Such adobe bricks can sometimes be purchased, in which case you can increase their attractiveness to bees by drilling nesting holes following the size recommended. |
|
|
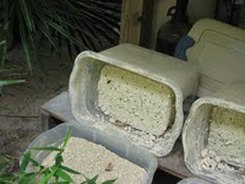 Mud blocks are easy to make where clay soils are common. To create one, half-fill a large plastic bucket with clean clay soil, and then fill the bucket with water. Stir the mixture into a slurry, and then allow it to settle. Remove sticks or debris that float to the surface, and slowly pour off most of the water. Finally, pour the remaining sediment into a mold (such as a shoe box-sized wooden box). Allow the block to dry for several days or weeks. Before it dries completely, make several indentations.
Mount the brick, or stack of bricks, facing east or southeast to catch the morning sun. Adobe will not hold up well in wet climates, so the block may need sheltering from rain. Some commercially
Making clay blocks in storage bins.
Clay can be a nice substitution under the same construction method. © Donna Brown
|
available adobe bricks have a stabilizing plasticizer mixed in; the plasticizer is not necessary and may not even be desirable.
|